Sunday, November 27, 2011

Pasta: A Family Affair

I am inviting you all to St. John's on Sheep Trail Road this Saturday, Dec. 3, for the bazaar. We finished the pasta last Sunday and it is packaged and ready to go. Doors open at noon.

The Italians have been baking bread and cookies. Later this week they will prepare the chicken noodle soup, chili and beef stew for the bazaar lunch. You can get a serving of soup, chili or stew, beverage, homemade pie, cake or cheesecake and all the homemade bread and butter you can eat for $6.00. You can feed your entire family--and please do--pasta at St. John's is a family affair.

Food, namely pasta, lured me out to St. John's--I wanted to learn how to make homemade pasta but it is the sense of community and family that draws me back each year. As soon as we walk in the door Annzie is there to greet us. We are embraced and she whispers, "thank you for coming, it's a bigga job". I am pulled aside and presented with a loaf of bread fresh from Annzie's kitchen. There are more hugs and good wishes as I don my apron. In between batches of dough I catch up with folks I only see here, once a year. As the work flows and eggs and flour are turned into pasta, so does the conversation--friendships are made and connections are forged.

This is my pasta family.

Annzie and me.

This is Marion, Annzie's son with Velia, they are cousins.

Howard and Velia, they are just no fun at all!

This is Johnny, Velia's son.

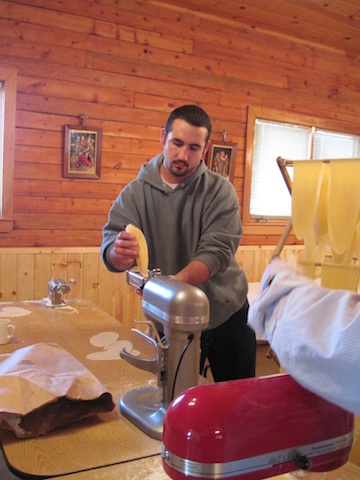
Johnny has two sons, Matt and...

Ben, who are of course Velia's grandsons.

Matt brought his girlfriend, Misty. Rosemary, on the right, has her back to the camera she kneaded just about every batch of dough. Her daughter, Christine, is the back on the left.

Here is Ben with Terrie, Rosemary's other daughter.


This is Ashley, Terrie's daughter and Rosemary's granddaughter. Ashley designed and welded the racks pictured here...

and here, photographed with Ashley's friend, Trina.

Here is a great shot of the racks and Mike, a new member of the pasta family.

Mike is married to Lisa, on the right, whose daughter is Rosemary's niece. (I know, this is starting to sound like a Southern Gothic novel but it's not.)

The tall lady next to Annzie is Lynn.

She is married to Paul, pictured here. They have three sons that have helped make pasta for the past eight years. I have watched their youngest, Nate, grow from a little boy into a young man.


This photo was taken in 2004 when I first met Nate. (My apologies to these young men, they were at St. John's again this year kneading and rolling pasta but I was chained to the food processor in the kitchen and did not get any photos before they left.)

This is Lynn's and Paul's eldest son, Kyle.

In this photo also taken in 2004, Nick, the second son, is rolling pasta with his father. You can see Kyle in the background. Nick is in Germany serving in the military and so was excused from pasta duty this year.


Christine, Rosemary's daughter is on the left. She is joined by my two friends, Kath, in the center, and Larinda, on the right. Christine and Kath go way back, they met years ago volunteering for another totally unrelated service organization.

Though not related, Kath is my sister/friend. We traveled through Italy together--eating, hiking, laughing and painting. Larinda is my guru, she teaches yoga in town. She is a dear friend yet young enough to be my daughter. Oh yeah, the cute guy in the middle is my husband.

We look forward each year to pasta days--part boot camp, part family reunion. By rough estimate, I processed over 225 pounds of flour into pasta dough this year and RT cracked over 1,800 eggs. It took three long days and many hands but this year we made over 400 pounds of pasta. Annzie's right--it is a "bigga" job.

Monday, November 14, 2011

Pasta 101

The first cooking class of the season was a session of pasta making and it was fantastic. Pasta is simple to make, a two ingredient recipe, eggs and flour. For six to eight servings you will need four eggs and three cups of flour. Measure the flour into a food processor with a metal blade attachment. Break the eggs into a container with a pourable spout and then stir them up with a fork, just to break up the yolks and slightly mix the eggs. Pulse the processor to lightly sift the flour and with the processor spinning slowly add the eggs. The dough will quickly come together. This photo shows exactly what you are looking for--the dough should look like little yellow lentils and should hold together when compressed. If your dough looks like cornmeal, it is too dry. Turn on your processor and add water, one tablespoon at a time until you get lentil sized blobs. It may only take a tablespoon.

If your dough comes together in a big ball or the blobs are larger than lentils your dough is too wet. Again, with the processor spinning add flour a tablespoon at a time.

When your dough is the right consistency, remove your blade and dump the contents of the bowl onto a clean dry surface.

Gather it together into a small loaf and knead it a few times, just to compress it into shape and wrap it up in cling film. Let it rest for twenty minutes, this resting period allows gluten to form.

After twenty minutes unwrap the dough and knead it slightly. The gluten has begun to form and your dough should feel different--silkier and more pliable. If so, it is now ready for rolling.

Using a sharp knife, cut your loaf into equal sections.

Dust each portion of dough with flour and press out into about 1/2 inch thick ovals.


If you have a pasta roller/cutter, set your roller at the widest setting and roll each portion through the machine. Set each portion on a clean tea towel, do not allow rolled portions to overlap, they will stick, and cover each finished layer with a fresh towel so the pasta does not dry out.

When you have rolled each portion on the widest setting, adjust your rollers to the middle setting and roll each portion through again. Each time you roll your pasta through the machine you are elongating the gluten strands, creating pasta with a beautiful texture. Remember to put each portion on a towel, layering and covering each layer.

Now decide how thin you want your pasta, adjust your roller and roll each portion. If you are making fettuccini or capellini you may not want to roll the dough out to the thinnest setting, if you are making ravioli or any other filled pasta, the thinnest setting is advisable.

I am making ravioli so I used my thinnest setting. Put a portion of dough on a clean dry surface and cut off the curved edges. You can save these and make mezza luna--half moon shaped pasta.

Fold your strip of pasta in half horizontally and very lightly crease the center fold--this is just to give you a visual half way line--and unfold the pasta. Break an egg into a bowl and beat it with a fork, this is your ravioli "glue". Using a pastry brush paint a line of egg wash down the center of the pasta strip. Now outline the strip in egg wash and visually divide the strip into an equal grid, making each section about an inch and a half wide. In the photo below you can see the egg wash grid in the upper section of the strip of pasta.

Now put a small spoonful of filling into each section of the grid. Do not over fill the ravioli or they will not seal properly and all the good stuff will leak out during cooking. (My ricotta cheese filling recipe is written below.) Carefully fold the top section over onto the filled section and begin to press between each filled section to seal the ravioli. I start at the back, at the fold, and press between each section on the egg wash grid, in a "U" shape. Then I try to push out the air and seal up each ravioli on the front edge. Nanzie, the pasta mamma who taught me to make ravioli, stressed the importance of pushing the air out of each ravioli. If a ravioli is "inflated" as it were, it will float in the cooking water making it harder to cook properly. If your ravioli are air free they will not float until they are done, making it easier not to over cook your pasta. This is trickier than one would expect and takes a deft hand so just do your best and practice often.

If you are freezing your pasta transfer it to baking sheets liberally dusted with flour. Ravioli should not be touching, fettuccini and other long pastas can be formed into little nests, see photo from class below. Place your baking sheets in the freezer immediately just until the pasta is frozen through and then transfer it to portion sized freezer bags. Label and date your bags and return them to the freezer promptly. Frozen pasta will hold in the freezer for up to six months but is much nicer when used within three months.

If you are cooking your pasta right away make sure your sauce is ready and hot because it does not take long to cook fresh pasta. Fresh ravioli will only take three to five minutes to cook. If your sauce is not ready cover the ravioli with a towel and put it in the refrigerator. When you are ready to eat bring a large pot of water to the boil. I use a six quart pasta pot and add a TABLESPOON of salt. I know you are all gasping but this is one of the most important keys to good pasta--properly salted water. The Italians say the pasta water should be as the sea--that is a bit much for me, but if you under-salt your water the pasta will have half the flavor it should. Remember, you are pouring the water off and your pasta will not absorb all the salt added. According to a study the pasta will only absorb less than one percent of the salt; in fact, if my math is correct, it absorbs less than half a percent of the salt. If you are making eight servings of pasta that works out to be about of 28 mg of sodium per serving. (Just FYI there are 480 mg of sodium in a 1/2 cup serving of Prego Traditional sauce! At the bottom of this entry I have placed a link to this study.)

Enough on that subject, trust me and millions of Italians, you are getting more sodium in a single serving of any prepared food than in a pound of properly seasoned pasta! It just looks scary because the salt isn't hidden.

Any way, as soon as you have slipped your pasta into the water set a timer for three minutes. At the end of three minutes reset the timer for two more minutes and test a corner of the ravioli for doneness. Perfect homemade pasta should be cooked "al dente"--meaning to the tooth and have a substance and texture you can feel with your teeth. If you have had it you will know it, all other pasta is just soft and at worst, gummy! Do not let this happen, not after all your hard work--be diligent and hover over your pasta. Pasta will float when it is done so watch it and taste it. When it is cooked drain the pasta into a colander always reserving a cup or so of the cooking liquid. Spoon your beautiful ravioli onto warmed plates and serve with your favorite sauce.

This is a three cheese ravioli with my homemade red sauce, finished with a dollop of fresh ricotta cheese, a drizzle of olive oil and freshly grated parmigiano.

Photos from our class:

After one demo batch of pasta dough Larinda mixed up the next. I just love avid pupils!


A perfect "catch" of fettuccini.


A very silly photo of myself--included because I want you to know how much fun we really do have. After all, the classes are held next door to the Wine Garden and most of my students take advantage of this fact. (Note the lovely glass of red to my left.)


Lisa is laying out freshly cut fettuccini. We had two pasta machines going during the class.


Beautiful fettucini nests ready for cooking or freezing.

Ricotta Ravioli Filing

1 c. ricotta cheese

¼ tsp. garlic powder

¼ tsp. salt

pepper

nutmeg

¼ c. parmigiano, finely grated

¼ c. fontina, grated

1 egg yolk

Put ricotta cheese, garlic powder, salt, a few grinds of fresh pepper and a few scrapings of fresh nutmeg into a small bowl and mix well. Stir in the parmigiano and fontina. Taste and adjust seasonings and add the egg yolk. Stir again to incorporate all the ingredients. Cover and refrigerate.


Red Sauce

3 tbs. EVOO

1 onion, diced

2 large cloves garlic, minced

2 stalks celery, sliced

1 large carrot, grated

3 tbs. tomato paste

1 tbs. basil, dried

1 tsp. oregano, dried

salt

pepper

½ c. white wine

2 cans whole tomatoes, squeezed

1 bay leaf

Over med. heat, film the bottom of a large heavy bottomed pan with EVOO. When the oil is warm add the onion, season with salt, stir and cook until translucent. Add the garlic, stir and cook 1 min. Add the celery and carrot, season with salt, stir and cook 5-7 min. Create a hot spot in the pan by moving the vegetables aside and add the tomato paste. As it begins to caramelize move it around the pan to allow maximum caramelization. Add the basil, oregano and a few grinds of fresh pepper, cook until herbs are fragrant, about 30 seconds. Add the wine, deglazing the pan with a wooden spoon. Let reduce about one minute and add the tomatoes. Stir and season to taste, bring to a low simmer. Add the bay leaf and simmer for 20 minutes. Remove the bay leaf, taste and adjust any seasoning. For a smoother sauce, puree with an immersion blender to desired consistency.


Link to Food Standards Agency Report on Sodium Absorption. http://foodbase.org.uk/results.php?f_report_id=120

Tuesday, November 8, 2011

The Pasta Mammas

This is Howard and Velia. Velia is one of my best friends and meeting her really changed my life. Nearly ten years ago Velia was greeting folks at Walmart when I asked her if she would teach me to make pasta. (The only thing I knew about Velia was that she was Italian, lived in Pingree and that she and her family made pasta.) A few weeks later she called and told me to go out to St. John's and help make pasta. She said she had to work but I was to tell everyone I was her friend and they would sort me out.
My husband Ralph is from Pingree, that explains a lot if you know Pingree and if you know Ralph. He went to school with Velia's children and so I asked him to take me out and be my introduction.
St. John's is a small log chapel, built on land donated by Velia's father-in-law, built by just about everyone in the community. It was a-buzz with energy and the sound of food processors whirring. After a brief introduction I was put to work and Ralph lit out. He returned for me in an hour but I was loathe to leave. Returning early the next day Velia was there and she put me to work in the kitchen with Annzie.

This is Annzie and if you are very lucky, you will meet her.

Annzie is Velia's aunt, she is not quite five feet tall, works tirelessly and was nearly ninety when I first met her, she will be 99 this March. She taught me how to mix the dough and that is what I did for the next several hours and have done for the past nine years. Every November I get a call from Velia, "Honey, we're making the noodles, can you come out?"

Making pasta is really simple but on a large scale it takes many hands. There are several steps (the dough is handled fourteen times) so the chapel is divided into work stations and everyone pitches in.

It all starts in the kitchen with the eggs. Last week we turned 600 eggs into 128 pounds of fettucini. RT cracked all the eggs and many of the jokes.

Muriel and I stand side by side and man the food processors, mixing the eggs and flour into dough for pasta.


After the dough is mixed up (step one) it is kneaded and then it rests allowing the gluten to form. (Gluten is created when flour is combined with liquid--in this case eggs.) In twenty minutes the gluten has begun to form and the dough is kneaded again, lengthening the gluten strands. Long gluten equals long silky pasta.

Marlene (in the photo above) and Rosemary have kneaded dough for the past two weeks, it is the hardest job, but they joke and carry on and make it look effortless. It is NOT--it is a back-breaking, wrist-aching job!


Annzie checks the dough and moves it to the next station where she divides each batch of dough into equal portions. Each portion is dusted with flour, shaped, flattened with a rolling pin and then handed off to the rollers.


The first roller, usually Howard, puts each portion through his pasta roller on the widest setting, making each portion about an eighth of an inch thick. Howard sends his portions to the next person whose pasta roller is on a medium setting. The pasta now resembles a long oval and has been lovingly handled six times and is much thinner.

The second roller hands off to a third roller and the pasta becomes the perfect thickness and is ready for hanging.

Last year RT was a "second roller" and Velia's grandson, Jeff, on the right, was a "third roller".

As sometimes happens with "boys" rolling turned competitive--RT and Jeff were really trying to out "crank" one another! Which was great because there is a lot of dough to roll but Ashley, the blur in the background, was really running to keep up.

It was her job to hang the rolled pasta on the racks to dry a bit before cutting. (Actually, I was shooting with out a flash so my camera extended the shots, capturing the motion. I love these photos because they really caught the energy and vibe of the day.)

When the dough dries to a leather-like consistency it is ready for cutting. Last year we tried an electric cutter attachment--it rolls at a constant speed and no one has to turn the handle, leaving the operator two free hands to catch it. A good cut and a good "catch" is essential for the next step (that's ten, if you're counting).

Marion is feeding the dough into the cutter and Velia is catching and transferring the noodles to a wooden dowel for drying.

A good cutter feeds the dough in evenly and a good catcher receives the freshly cut noodles with an open flat hand, between the thumb and forefinger--no grasping or grabbing. Ideally, the dough falls into the hand with no overlapping noodles and then is easily transferred to the drying racks. If the noodles overlap and are compressed onto each other in a clumsy "catch" the pasta "hangers" have to untangle them. (I am an excellent catcher--and usually catch and hang after I have finished mixing dough.)


The "hangers" literally hang each noodle on a wooden dowel--each noodle must be hung at its middle and can touch, but not over lap.

The noodles dry into the evening until the night shift--the poor souls that live nearest and have the most experience--return to move all the noodles from the racks to the tables. It can take days for the noodles to dry completely so they are frequently checked. Finally the pasta is ready for weighing and packaging, steps thirteen and fourteen!

The noodles are featured at the holiday bazaar fundraiser held at St. John's Catholic Church the first Saturday of December. There are other items for sale, homemade pies, Italian bread and cookies, candies and hand crafts. An excellent lunch is available too and the chicken noodle soup is made from free range chickens and some of the handmade noodles. The doors open early but purchases are not allowed until the noon bell rings when there is a dash for the packages of pasta. One of my jobs has been to restock the pasta packages and I am often done long before all the lunches have been served!

If interested, you are all invited out to St. John's, Saturday, Dec. 3. Doors open at noon and lunch is served until just before mass at 5:00 pm. St. John's is in Pingree, head out highway 39, pass through Rockford and continue out about five more miles to Sheep Trail Road--seriously--for the past three years I have had to wait for sheep in November--turn right and you will see a little log chapel on the right.